Author Archives: admin

Halloween Trick or Treat Wood Sign

As I was working on a different Halloween wood sign, I came up with this idea of a “Trick or Treat” wood sign. I had some pieces of scrap wood laying around and took 3 pieces to combine them in making the top piece of the wood sign. Then I designed away to simply attach the wood sign to a holder I made where the holder has 3 dowel rod pegs so that the wood sign can slip onto the holder. Then by using my 3/4 inch drill bit I drilled a hole at the bottom (about 4 inches in depth) of the sign holder to fit a larger dowel rod as a pole. After that I made a base so the other end of the larger dowel rod can slip into that hole so that way the entire sign can stand up.

Without realizing it, the way of designing the sign holder part, base and the large dowel rod to keep it all together, I can design other signs for different holidays, making the hole thing interchangeable.

I do plan on taking this concept and creating a product for people to buy, the one I made here is basically a prototype. I do know that this type of product would be a “Made To Order” item, but as to how customers to go about buying it, I haven’t decided on that yet. One idea is making it to where their is a set price for the Sign Holder part, the Poles, and the Base and then where you can choose as to how many signs you would like to have made for the stand where each actual sign has a set price as well.

The other thing is that this Wood Sign would come with a short pole where you can use it as a Table Display and a longer pole as an Outside Porch Sign. The entire wood sign will have a clear waterproof coat so that it can be used either inside or outside.

This Trick or Treat” Wood Sign would be one of the options to buy. The wood sign itself is stained in Red Medium Tone & Red Dark stain, and the wording is free-handed painted in black acrylic paint. On the top right corner of the sign features a Bat that is stained in Dark Walnut. The sign holder, poles and base are stained in Dark Walnut.

Halloween Trick or Treat Wood Sign – Table Display


Halloween Trick or Treat Wood Sign – Outside Porch Display


Bones Coffee Wood Coasters

I thought I would try my hand at wood burning for the first time and figure what better way to start by using a sticker design I once received from ordering Bones Coffee. I have also been wanting to make a set of wood coasters for a while so I made a set of Bones Coffee wood coasters. The wood burning is not perfect but I don’t think its to bad looking for the first time. Everything was done by hand and let me tell ya it wasn’t easy to do.

The way I went about doing this was by first tracing the Bones Coffee sticker onto a piece of paper to get the outline then using carbon paper to transfer the outline onto each piece of wood and then wood burning the design. Once I got all of the wood burning done, I stained each coaster using a dark red stain and then applied 5 coats of Minwax Polycrylic Protective Finish to each coaster.

After I made the coaster I then decided to make a coaster holder for them. I used a dark walnut stain for the coaster holder and also applied Minwax Polycrylic Protective Finish.

Custom Doll Wood Chair

Last month someone on facebook contacted me about building them a custom wood chair for their porcelain doll. The person sent me a rough sketch with approximate dimensions for the chair to be built. Now seeing that I am new to wood working and never made a chair before, the person understood that part witch was nice, but over the entire chair came out really nice. It took me about 2 weeks to build and then a couple days to stain, paint and to clear coat the chair.

I also asked for pictures of their doll to see what it looked like, and I suggested to them what about going with having the chair look old. Their doll has a bit of a vintage look to it, so having the chair look old made it all tie into together nicely.

I first stained the chair with a dark walnut stain, waited a little bit then painted the entire thing with white acrylic paint. Once the paint dried, I then started to scrape away the paint first using a razor blade but wasn’t working out to well so I switched over to using a flat head screw driver, which worked out fine, but was taking off a bit too much. So then I decided to try using a piece of sand paper and that worked out really well. Using the sand paper allowed me to remove the paint and keep the stain more which helped give it that warn weathered look I was going for.

The chair came out great looking and the person was very happy with out it turned out. Now their doll has a nice weathered warn chair to sit on. I also had a lot of fun making this chair and wouldn’t mind making another one for someone else at some point.

Candlestick and Pizza Cutter Holder

Today I made a Candlestick Holder and a Pizza Cutter Holder in the shape of a slice of pepperoni pizza. I also have my sign ready to go for when I make TikTok videos since I don’t have a lot of followers yet. This sign will be in each video I make.

Some how while working I got my finger caught while using my vise… the part the you use to turn the vise open and closed, I got my figure caught between that part and the vise itself, not once, not twice, but 4 different times. My vise and I are no longer friends!

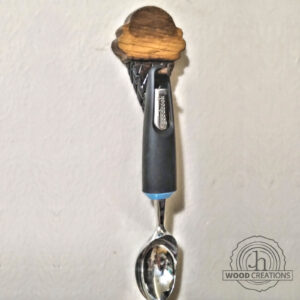
The Pizza Cutter Holder is similar to the Ice Cream Scoop Holder I’ve made that is shown here. I will have to admit that ever since I’ve made this holder for my home it’s become a lot easier to find the scoop since it is now on the wall. Not to mention that it makes a really neat wall decoration.